SampleStack User Manual
Table of Contents
- Introduction
- Getting Started
- The Interface
- Managing Libraries
- Working with Samples
- The Sample Player
- Cue Points and Slicing
- Audio Editing
- Applying Fades
- Sample Metadata
- Copying and Converting Samples
- Supported Hardware
- Keyboard Shortcuts
- Troubleshooting
Introduction
SampleStack is a macOS application for managing audio samples destined for hardware samplers. Whether you’re using Eurorack modules like Morphagene and Multigrain, or standalone samplers like the Elektron Digitakt and Octatrack, SampleStack helps you:
- Organize your sample collection with tags, ratings, and folders
- Validate samples against hardware requirements before copying
- Convert incompatible samples to the correct format automatically
- Edit cue points and apply fades for seamless playback
- Export with the correct folder structure for each device
Getting Started
System Requirements
- macOS 14.0 (Sonoma) or later
- Approximately 50MB disk space for the application
- Additional space for your sample libraries
First Launch
When you first launch SampleStack, the sidebar will be empty. Start by adding a sample library:
- Click File → Add Sample Library or press the + button in the sidebar
- Navigate to a folder containing your audio samples
- Click Open
The first library you add automatically becomes your Sample Library, indicated by a waveform icon. This serves as your central collection of all samples.
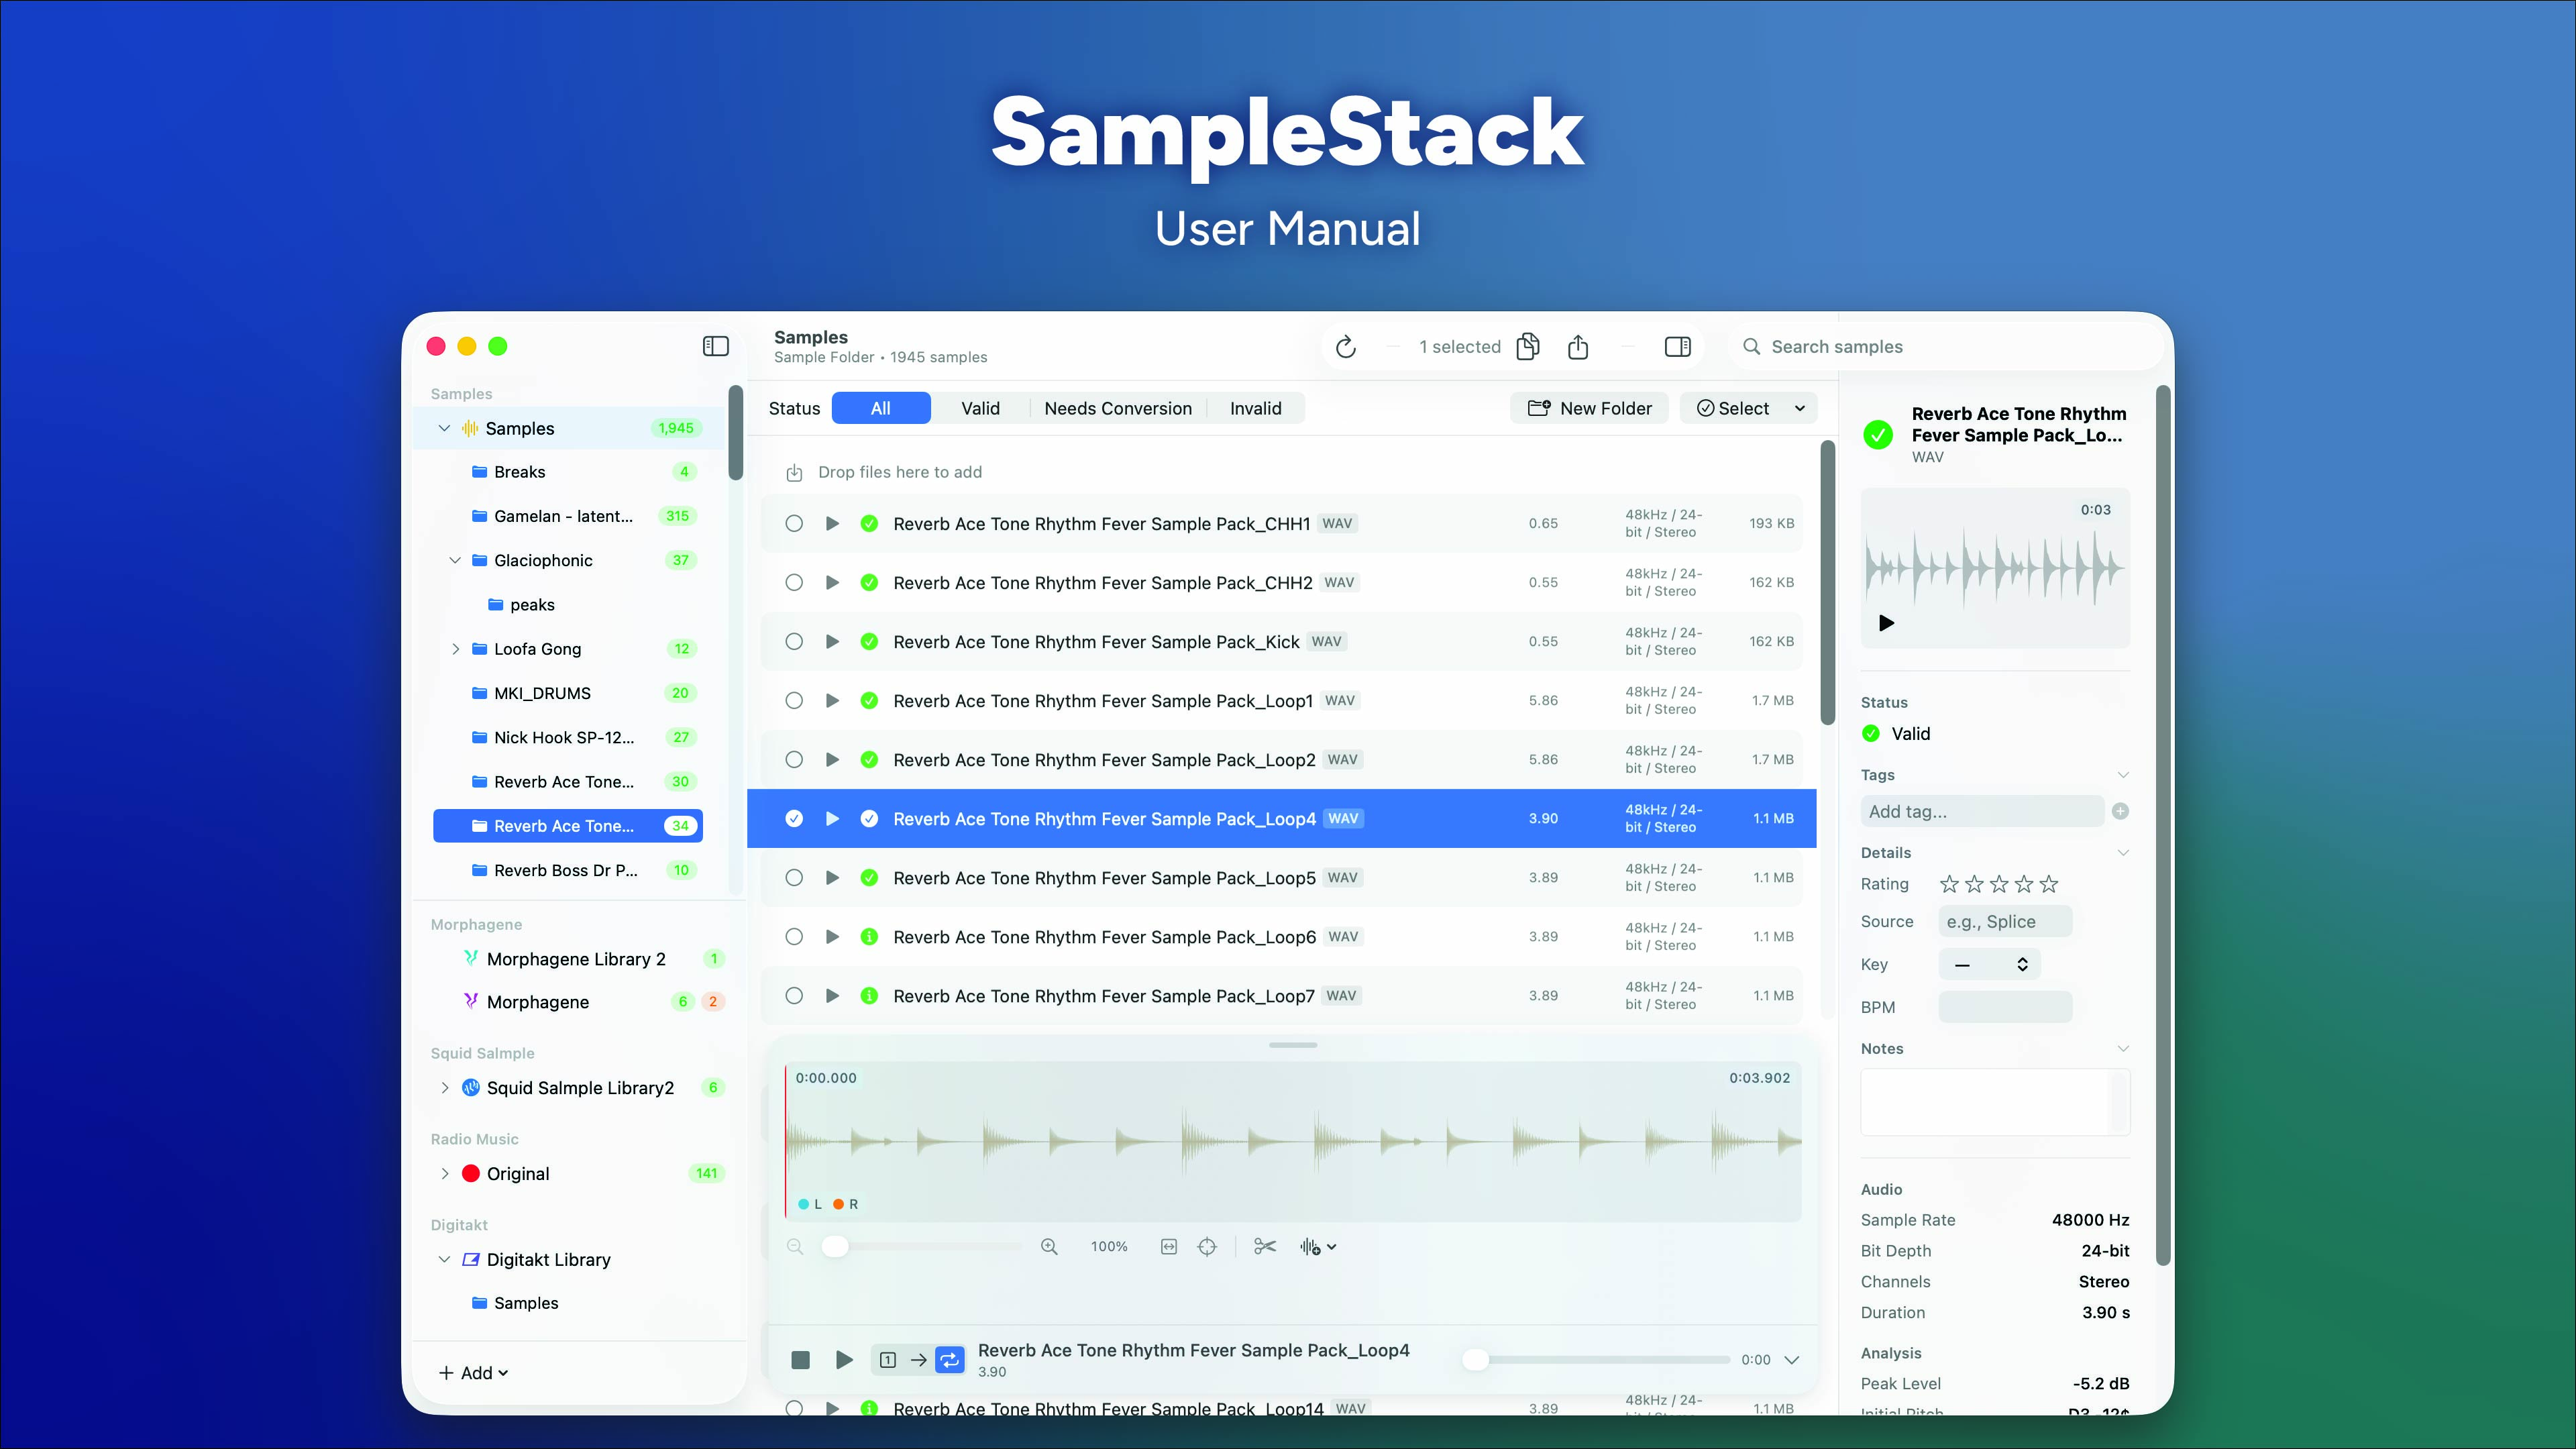
The Interface
SampleStack uses a three-column layout:
Sidebar (Left)
The sidebar is divided into two sections:
Samples Section (Top)
- Your sample libraries (central repositories)
- Tags browser (filter by tag)
- Ratings browser (filter by star rating)
Collections Section (Bottom)
- Hardware-specific libraries grouped by manufacturer
- Each collection shows the manufacturer icon and custom color
Library Features:
- Click the disclosure triangle to expand a library’s folder tree
- Click a folder to filter the main view to that folder’s contents
- Drag the divider between sections to resize
Content Area (Center)
Displays the contents of the selected library or folder:
- Hierarchical view with expandable folders
- Search bar to filter by filename
- New Folder button to create folders
- Validation badges showing sample compatibility
- Floating player at the bottom for preview
Inspector (Right)
Shows details for the selected item:
- Library info: Collection type, folder structure, validation status
- Folder info: Sample counts, subfolder counts
- Sample info: Audio properties, validation issues, metadata editor
Managing Libraries
Adding Libraries
Sample Library (Central Repository)
- File → Add Sample Library
- Contains all your source samples
- Samples are analyzed lazily (on-demand) for fast loading
Hardware Collection
- File → New Collection
- Choose the hardware type
- Configure folder count (projects, banks, stations)
- Pick a location (SD card or local drive)
Library Context Menu
Right-click any library for options:
- Set as Sample Library / Unset: Toggle sample library status
- Set Collection Type: Change the hardware type
- Set Color: Customize the sidebar icon color
- Remove: Remove from SampleStack (doesn’t delete files)
- Reveal in Finder: Open the folder location
Folder Navigation
Libraries can be expanded in the sidebar to show their folder hierarchy:
- Click the triangle next to a library name
- Click any folder to filter the content view
- Click the library name to show all contents again
Working with Samples
Browsing Samples
- Arrow keys: Navigate up/down through samples
- Right/Left arrows: Expand/collapse folders
- Enter: Rename selected item
- Spacebar: Play/pause selected sample
- Double-click sample: Play from beginning
- Double-click folder: Expand/collapse folder
Selecting Samples
- Click: Select single sample
- Cmd+Click: Add/remove from selection
- Shift+Click: Select range
- Cmd+A: Select all visible samples
Sample Validation
Each sample shows colored badges indicating its status:
| Badge | Meaning |
|---|---|
| Green | Compatible with hardware |
| Orange | Needs conversion (fixable) |
| Red | Has errors (wrong filename, unsupported format) |
| Gray | Not yet analyzed |
Click a sample to see detailed validation info in the inspector.
File Operations
Rename
- Right-click → Rename, or press Enter
- For modules with filename requirements (like Morphagene), validation updates automatically
Move
- Drag samples onto folders to move them
- Drag folders onto other folders to reorganize
- Undo with Cmd+Z
Delete
- Right-click → Delete
- Files move to Trash (use Finder’s “Put Back” to recover)
Ignore
- Right-click → Ignore to hide from validation stats
- Useful for metadata files, system files, etc.
- Ignored samples appear dimmed with an eye-slash icon
Importing from Finder
Drag audio files from Finder into SampleStack:
- Drop on the content area to import to the library root
- Drop on a folder row to import to that folder
- Drop on a sample row to import to that sample’s folder
- Supported formats: WAV, AIF, AIFF, MP3, M4A, FLAC, OGG, RAW
The Sample Player
Compact Player
The floating player appears at the bottom when you select a sample:
- Stop button: Stop playback, return to selection start (or clip start)
- Play/Pause: Toggle playback
- Mode selector: One Shot, Continuous, or Loop
- Scrubber: Shows playback position, click to seek
- Time display: Current position / total duration
- Expand button: Open the expanded player
Playback Modes
| Mode | Behavior |
|---|---|
| One Shot | Play once, then stop |
| Continuous | Play to end of file |
| Loop | Repeat selection or full sample |
You can set your preferred default playback mode in Settings → General → Playback.
Expanded Player
Click the expand button for the full waveform view:
Waveform Display
- Stereo waveforms shown separately (cyan = left, orange = right)
- Yellow markers indicate cue points
- Selection region shown as highlighted area
Zoom Controls
- Slider: Drag to zoom in/out (uses exponential scaling for consistent feel)
- +/- buttons: Zoom in/out
- Keyboard: Press
=to zoom in,-to zoom out - Pinch gesture: Two-finger pinch on trackpad (zooms toward cursor)
- Cmd+Scroll: Scroll wheel with Command key (zooms toward cursor)
The zoom uses exponential scaling, so it feels consistent whether you’re working with short 1-second clips or long 60-second samples.
Panning
- Two-finger scroll: Pan horizontally when zoomed
- Option+drag: Pan with mouse when zoomed
- Minimap: Click or drag on the overview bar above the waveform
Selection
- Drag: Click and drag to select a region
- Click slice: Click a slice in the list to select that region
Cue Points and Slicing
Cue points (also called splice markers) divide a sample into slices. They’re used by hardware like Morphagene and Erica Sample Drum.
Adding Cue Points
Manual
- Option+click on the waveform to add a cue point
- Scissors button: Add cue point at the playhead position
Automatic (Transient Detection)
- Click the menu button (waveform icon with plus) next to the scissors
- Choose sensitivity:
- Low: Strong transients only (drum hits)
- Medium: Moderate transients
- High: Subtle changes (catches more onsets)
- Cue points appear at each detected transient
Editing Cue Points
Move
- Drag cue markers on the waveform
- Marker turns orange while dragging
Rename
- Double-click a slice name in the slice list
- Type a new name, press Enter to save (Escape to cancel)
Delete
- Right-click a marker → Delete
- Or click the X button next to the slice in the list
Saving Changes
Cue point changes are non-destructive until saved:
- “Unsaved” badge appears when you have pending changes
- Save button: Write changes to the WAV file
- Discard button: Revert to original cue points
- Undo/Redo: Cmd+Z and Cmd+Shift+Z work for cue point operations
Audio Editing
SampleStack includes comprehensive audio editing tools accessible via the Edit menu (scissors icon with “Edit” label) in the expanded player. All edits are non-destructive until you click Save.
The Edit Menu
The Edit menu is always visible in the expanded player controls. You can also right-click on the waveform to access the same options.
Splice Operations (add cue points)
- Splice at Playhead: Add a cue point at the current playhead position
- Splice Selection: Add cue points at both ends of the selected region
- Detect Transients: Automatically detect transients and add cue points
- Low sensitivity: Strong transients only (drum hits)
- Medium sensitivity: Moderate transients
- High sensitivity: Catches subtle changes
Destructive Edits (modify audio)
- Split at Playhead: Split the file into two separate files at the playhead position. The second file gets a “-2” suffix.
- Crop to Selection: Delete all audio outside the selected region
- Cut Selection: Remove the selected region, keeping the audio before and after
New Sample Operations
- New Sample via Cut: Extract the selection to a new file AND remove it from the original
- New Sample via Copy: Extract the selection to a new file, keeping the original intact
Non-Destructive Workflow
All destructive audio edits work on a temporary copy:
- Make your edit (crop, cut, split, etc.)
- The waveform updates immediately to show the result
- “Audio modified” badge appears with Save/Discard buttons
- Playback uses the edited version so you can preview
- Apply additional edits if needed (they stack)
- Click Save to write changes to the original file
- Or click Discard to revert to the original
This means you can experiment freely without worrying about damaging your original files.
Split at Playhead
The Split operation divides a file into two:
- Click on the waveform to place the playhead where you want to split
- Open Edit menu → Split at Playhead
- Preview the first part (the waveform shows only the first half)
- Click Save to commit:
- Original file is replaced with the first part
- Second part is saved with “-2” suffix (e.g., “sample.wav” → “sample-2.wav”)
- The folder refreshes to show both files
Applying Fades
Fades help eliminate clicks at the start or end of samples (the “through-zero” issue).
The Fade Menu
The Fade menu (waveform icon with “Fade” label) is always visible in the expanded player controls, next to the Edit menu. It’s disabled when no region is selected.
Region-Based Fades
- Select a region by dragging on the waveform
- Click the Fade menu (or right-click on the waveform)
- Choose:
- Fade In (Linear): Gradual fade from silence
- Fade In (Logarithmic): Preserves transients better
- Fade Out (Linear): Gradual fade to silence
- Fade Out (Logarithmic): Natural-sounding decay
Non-Destructive Editing
Fade changes are applied to a temporary file:
- Waveform updates to show the effect immediately
- “Audio modified” badge appears with Save/Discard buttons
- Playback uses the edited version so you can preview
- Save: Writes changes to the original file
- Discard: Reverts to the original audio
Through-Zero Detection
The inspector shows a warning if a sample doesn’t start or end at zero amplitude:
- Yellow triangle icon: Through-zero issue detected
- Hint: Use the expanded player to apply fades
Sample Metadata
Adding Metadata
Select a sample and use the inspector panel:
Tags Section
- Click “Add tag” and type a tag name
- Press Enter to add, or click a suggestion
- Click the X on a tag to remove it
Details Section
- Rating: Click stars (1-5) to rate
- BPM: Enter beats per minute
- Key: Enter musical key (e.g., “Am”, “C#”)
- Source: Note where the sample came from
Notes Section
- Free-form text field for any notes
Multi-Sample Editing
When multiple samples are selected:
- Common tags (in all samples) can be removed from all
- Partial tags (in some samples) can be added to all or removed from all
- Use “Add tag” to add a new tag to all selected samples
Browsing by Metadata
Tags Browser
- Expand “Tags” in the sidebar
- Click any tag to filter to samples with that tag
- Click a library or folder to clear the filter
Ratings Browser
- Expand “Ratings” in the sidebar
- Click a star rating to filter (5★ to 1★)
- Click a library or folder to clear the filter
Copying and Converting Samples
Copy to Library
- Select samples in your sample library
- Click the Copy to Library toolbar button (or drag to a collection)
- Choose the destination library
- Choose the target folder within that library
- Configure options:
- Convert incompatible samples: Auto-convert format
- Truncate long samples: Trim to hardware max duration
- Overwrite existing: Replace files with same name
- Click Copy
Conversion Preview
The sheet shows which samples will be:
- Copied as-is: Already compatible
- Converted: Format will be adjusted
- Skipped: Cannot be converted (shows reason)
What Gets Converted
| Property | Conversion |
|---|---|
| Sample Rate | Resampled to target rate |
| Bit Depth | Converted (including to 32-bit float for Morphagene) |
| Channels | Mixed to mono or duplicated to stereo |
| Duration | Truncated if exceeding hardware limit |
Supported Hardware
Eurorack Modules
Multigrain (Intellijel)
- 48kHz, 16-bit, Stereo
- 32 second max (soft limit)
- Structure: /Wavs/, /Project01-48/, /Recs/
Morphagene (Make Noise)
- 48kHz, 32-bit float, Stereo
- ~2.9 minute max per reel
- Filenames: mg1.wav through mgw.wav
- Supports cue points for splices
Squid Salmple (ALM Busy Circuits)
- 44.1kHz, 16-bit, Mono
- ~11 second max
- Structure: /ALM022/Bank##/ with 8 channels
Erica Sample Drum (Erica Synths)
- 48kHz, 16-bit, Mono
- Limited by 32MB RAM
- Supports cue points
Radio Music (Music Thing Modular)
- Any sample rate/bit depth
- Mono preferred
- Structure: Up to 16 station folders
Standalone Samplers
Blackbox (1010music)
- Flexible format (48kHz 24-bit preferred)
- Structure: /Presets/, /Samples/
- Also: Bluebox, Lemondrop, Fireball
Octatrack (Elektron)
- 44.1kHz, 16-bit (24-bit for Flex)
- Structure: /AUDIO/ with project folders
- 128 samples per project
Digitakt (Elektron)
- 48kHz, 16-bit, Mono
- 33 second max
- 2048 samples on +Drive
Keyboard Shortcuts
Navigation
| Action | Shortcut |
|---|---|
| Navigate samples | ↑ ↓ |
| Expand folder | → or Double-click |
| Collapse folder | ← or Double-click |
| Select all | Cmd+A |
Playback
| Action | Shortcut |
|---|---|
| Play/Pause | Spacebar |
| Play from beginning | Double-click sample |
| Stop | (click stop button) |
Waveform
| Action | Shortcut |
|---|---|
| Zoom in | = |
| Zoom out | - |
| Zoom (trackpad) | Pinch gesture |
| Zoom (mouse) | Cmd+Scroll |
| Pan | Two-finger scroll |
| Add cue point | Option+click |
Editing
| Action | Shortcut |
|---|---|
| Undo | Cmd+Z |
| Redo | Cmd+Shift+Z |
| Rename | Return or Right-click → Rename |
| Delete | Cmd+Backspace |
| Edit menu | Right-click on waveform |
Troubleshooting
Samples Not Appearing
- Check that the folder contains supported audio files
- Try refreshing the library (right-click → Reveal in Finder, then re-add)
- Large libraries may take time to scan initially
Validation Warnings
“Wrong sample rate”
- Sample will be resampled during copy/convert
“Wrong bit depth”
- Sample will be converted during copy/convert
“Wrong channel count”
- Stereo will be mixed to mono, or mono duplicated to stereo
“Duration exceeds limit”
- Enable “Truncate long samples” when copying
“Invalid filename”
- Some modules (like Morphagene) require specific filenames
- Rename the file to match the required pattern
Through-Zero Warnings
If the inspector shows a through-zero warning:
- Open the expanded player
- Select the region at the start or end of the sample
- Apply a fade (Edit menu or right-click)
- Save the changes
Cue Points Not Saving
- Make sure you click Save after editing cue points
- The file must be writable (check permissions)
- Cue points are stored in the WAV file itself
Performance Issues
- Large sample libraries are scanned lazily to improve performance
- Detailed analysis happens when you select a sample
- Waveforms are cached to disk and persist across app restarts
- Background precaching generates waveforms after library scanning
- A progress indicator in the sidebar shows scanning/caching status
- Close other applications if the UI is sluggish